This week I’ve written a little post about my experience using QLab and a few (hopefully) useful tips particularly geared towards theatre composers and musicians. Although to avoid boring you to tears it does gloss over the absolute basics and assumes a basic working knowledge of the program. If you’re a first timer I would heartily recommend having a read through QLab Show Control by Jeromy Hopgood as it also includes loads of practical examples and ideas.
Anyway, to the tips!
Tip #1 – QUICKLY ADDING SLICES FOR DEVAMPING
By far the easiest way to add slices to a cue is by inserting markers with whichever DAW you’re using to compose. Where you place the markers depends on context and the type of music you’re writing, but as a rule of thumb try and place them as frequently as possible whilst retaining a piece’s musicality.
In the example below I’ve inserted slices every bar, but for a devamp cue that needs to be precisely timed with a particular action you might want to go as frequent as a marker on every beat. Sometimes this isn’t possible as it’ll make the music sound jumpy, but it works particularly well for repetitive or percussive music – so bear this in mind whilst composing the cue.

Markers in Logic Pro

Converted to slices in QLab
QLab won’t pick up on the markers if you import the file as an MP3 so stick with a trusty WAV, AIFF, or CAF file instead and you can’t go wrong!
Also, annoyingly, you can’t use both infinite looping and slices in the same cue. I really hope they address this in future versions, but for the time being you can just slice up a REALLY long cue so the performers never run out of music.
TIP #2 – OFFSETTING SLICES
Still on the subject of slices, I quite often use a technique borrowed from video game audio that leads to silky smooth transitions. This time I’ve tried to demonstrate it with music notation instead:

The red lines are slices (or where you would insert markers in your DAW). Instead of being exactly on the bar, they are offset to the beat before. Then in the devamp cue I would add some sort of pickup melody that leads into the next part of the song.
To make it sound EVEN smoother, add a fade cue that subtly fades out Cue A when Cue B is triggered, that way you won’t get a jarring transition between the two.
And finally, make sure the lead in / pickup melody in Cue B doesn’t clash with the harmony of Cue A as there will be a brief moment where they both play together. Usually I’ll just have a melodic lead in and then any bass / harmonic lines or percussion will come in at the start of the next bar. That way you get a very fluid and musical transition without anything sounding discordant.
TIP #3 – Intro + LOOP

Sometimes it’s a bit boring to just have a plain ol’ loop so an easy way to make it sound more interesting (and more musical) is to use an intro first. This will then automatically switch to the loop, as long as they have both been composed to seamlessly work together. But if you’re ok creating a seamless loop, you’ll have no problems tweaking the intro to be seamless too!
Obviously you want the intro to follow on from the loop automatically, so make sure ‘auto-follow’ is turned on and that either ‘play count’ or ‘infinite loop’ is selected in your actual loop.
Also, you’ll need to make sure the end of your intro matches the end of your loop to make the transition completely seamless. But with all that you can have a much more dynamic intro to the cue but still retain an infinite loop.
TIP #4 – MODULAR CUES IN REHEARSALS

If I ever bring a new piece of music into rehearsals for a scene that is likely to rapidly change I’ll export a normal version and a version split into various separate stems or sections.
For example I might split a song into short sections and then use auto-follow in QLab during the rehearsal. That way you can easily remove a section or change the order around as the choreography or staging changes. Then you don’t have to always export a new version of the song from your DAW which can be time consuming and ruin the focus of performers.
Of course once the timing has been finalised remember to bounce down the sections to a single audio file. Even if the mind boggling web of connected sounds makes sense to you in the rehearsal room, it probably won’t a few months down the line or if a touring stage manager needs to make changes on the road.
TIP #5 – SOUNDCHECK
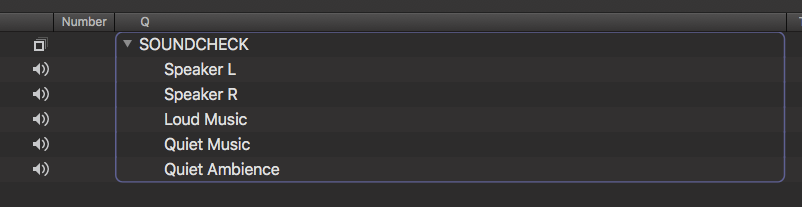
And finally something that has come in handy numerous times, especially for touring shows that need to be quickly and easily mixed for multiple venue sizes, is to add a soundcheck cue.
I would include an audio cue that individually targets each speaker your show uses to test they’re plugged in correctly and outputting sound.
Also it’s handy to have your loudest and quietest cues from the show so you can set the overall audio level based on room size. Usually the quietest cue will be something like ambience but you might want to include a quiet musical cue as well. Bear in mind an empty theatre sounds different to one with an audience, so you’ll generally want to turn the levels up a tad louder when soundchecking to compensate for this.

Thanks for the shout out for my book, Luke. Great article. I feel like there are a lot of composers for the stage that don’t fully understand how to compose for use in playback with QLab. Thanks for contributing to the conversation!
Hi Jeremy, great to hear from you! Your book was invaluable when I had to get to grips with QLab very quickly. Agreed that it isn’t always used to its full potential, especially to make the music as dynamic and interactive as possible.